Showing posts with label Holy Moley that's good!. Show all posts

Saturday, November 23, 2024

Cowboy Candy


A favorite of brother Don's fishing buddies, I have to make an entire batch for them to enjoy at the lake cabin and enough to take back home to Chicago. This is a hot/sweet treat, if you aren't a fan of jalapeno's heat, you may not like these.  If you are, they are a refreshing addition to potato and macaroni salad, hamburgers, and lunch meat sandwiches. Be creative!  Try them wherever a splash of heat might be good.

Ingredients:

3 lbs. sliced jalapenos (1/8"-1/4" depending on preference)

3 cups apple cider vinegar

6 cups white sugar

1/2 teaspoon turmeric

1/2 teaspoon celery seed

3 teaspoons granulated garlic

1 teaspoon ground cayenne pepper

1 tablespoon black peppercorns


Directions:

Get your water bath running and sterilize 8 pint jars. Put your lids in a separate shallow water bath to simmer. Prepare your work space for canning (trivets, funnel, metal ladle, clean towels). I leave the empty jars in the water bath while I prepare the rest.  The water should top your jars by at least 2". 

Wash jalapenos. Put on gloves. Remove the stem  and cut the jalapenos into 1/8" to 1/4" slices. Do not remove seeds or white membrane. Set aside.

Dissolve sugar, tumeric, celery seed, garlic, and cayenne pepper in the apple cider vinegar and in large pot. Bring to a boil and simmer for 5 minutes.

While the syrup is heating, remove the sterilized jars from the water bath and make sure your work station is ready for loading.  

Add jalapenos to the pot and return to a boil. Boil for 4 minute
s. Remove from the heat and load peppers into sterilized canning jars.  I prefer pint jars. Really pack them in. 

Ladle hot syrup into the loaded jars to within 1/4" of the rim.  Using a metal chop stick or knife, push down on the peppers to remove any air bubbles. Wipe the rim of the jar with a slightly moistened paper towel to remove any syrup on the rim. 

Place a can sealing lid atop each jar and tighten the bands finger tight. 

Put them back in your water bath and bring to a boil.  Process at a full boil for 10 minutes. Remove from the water bath and place on either a thick towel or a cooling tray. Allow to "cure" for about a week.  They'll develop their best color and flavor in that time.  They are however, good to eat immediately.  They may just not be as hot. 


Tuesday, December 17, 2013

Nana's Sweet Potato Pie

I'm not going to lie to you.  This pie is so good, you'll stick a fork in your grandmother's hand if she tries to steal a bite.

Thanksgiving is coming up.  At my house, pumpkin pie reigns supreme. Every year I watch my relatives dive into a national favorite.  I watch, but I never partake.  I'm no fan of pumpkin pie.  I am a fan of sweet potatoes.  This year, I decided to take the bull by the horns and make my own pie.  In advance.  Just for me.  Let them have their pumpkin. I gots me some sweet taters.

This is a delicious pie.  I kid you not.  Easily made it into my top five pies.  Try it. You won't be disappointed.  Got it from a NPR podcast.  You just never know.

Ingredients:

3 large sweet potatoes (about 1.5 lbs)
2 large eggs
1 1/4 cup granulated sugar
1 stick unsalted sweet butter, room temp
1 can evaporated milk
1 teaspoon cinnamon
1/4 teaspoon nutmeg
1 9-inch pie crust

Directions:

Boil sweet potatoes in their skin until fork tender.  Drain water and allow potatoes to cool.  Peel and discard the skin. In a medium bowl, add the sweet potatoes, eggs, butter cinnamon, nutmeg, and sugar, and whip until incorporated.  Add evaporated milk a little at a time until the filling becomes loose.  Pour the filling into the pie crust.

Preheat oven to 350 degrees.

Take the remaining evaporated milk, 1/2 teaspoon cinnamon and 1/4 cup sugar and heat just until sugar is dissolved. Brush the mixture on top of the filling.

Place pie in oven and bake for 50 minutes or until the pie is firm to the touch.  Remove pie from oven and allow to cool slightly before eating.


Follow Me on Pinterest

Sunday, October 6, 2013

Pork Carnitas

You have to try this recipe.  It was so good, I didn't even have time to take a picture of it before it was gone.  The most amazing thing is it is made of pork.  I usually hate pork.  But this is melt in your mouth magic.  I'm not kidding.  You can also double this recipe.

Ingredients:

5 lb pork shoulder
1 tablespoon chopped garlic
1 tablespoon adobo sauce
juice of 2 limes
1/2 cup orange juice
12 ounces beer

Garnish

purple onion, small dice
avocado
fresh cilantro leaves
lime juice

Rub

1 teaspoon salt
1 tablespoon cumin
1 teaspoon chili powder
1 teaspoon black pepper
1/4 teaspoon cinnamon
1/2 teaspoon cayenne

Directions:

Put the pork shoulder in your slow cooker.  Rub the garlic all over the meat.  Pour the rub over the meat and rub it in.  Add the lime and orange juice, beer, and adobo sauce. Cover and cook for 6 hours.  Shred the meat with forks and return to slow cooker.  Preheat broiler.  Line a baking sheet with aluminum foil.  Place the meat on the cookie sheet and broil a few minutes until the edges sort of carmelize on the pork.

Serve on corn or flour tortillas with fresh cilantro, diced onions and a drizzle of lime juice.

Follow Me on Pinterest


Sunday, August 4, 2013

Cowboy Kick in the Spurs


I don't know about your garden, but the weather has been awfully kind to my peppers this year.  I've got a bumper crop of banana peppers and jalapenos, which is to be expected, but I also have for the first time ever...plentiful bell peppers, pasillas, cayennes, Peter peppers, seranos and Thai red chilis.  The only peppers that aren't doing tremendously are the pepperocinis and I think that's because they get shaded for about 4 hours during the day.  Otherwise, it's been a super year for peppers. 

Just what do you do with all of them?  I put up 4 pints of pickled banana peppers, and I'm trading some, but I am still overrun with jalapenos.  So I decided to amke some of that delicious hot jalapeno jam that warms things up during the cold winter months ahead.  This jame will not set to a jelly-like consistency, but is meant to be pourable and served as a condiment.  If you want your mam more firmly set, add more pectin.  This is delicious over a brick of cream cheese and served with crackers or crudites.

Ingredients:

1 lb green or red bell peppers, washed and seeded
3/4 lb jalapenos, washed, stems removed
6 cups sugar
1 1/4 c apple cider vinegar
1/4 c lemon juice
1 t kosher salt
3 oz. liquid pectin

Directions:

Wash and remove seeds from bell peppers.  Wash and remove stems from jalapenos.  Put both in a food processor and pulse into a fine dice.  Place in a large, non-reactive pot and combine with sugar, vinegar, lemon juice and salt.   Bring to a boil.  Reduce heat and simmer 10 minutes.  Return to a boil and add the liquid pectin.  Bring to a rolling boil for 1 minute.  Ladle into sterilized pint jars.  Wipe down the rims with a clean cloth dipped in boiling water.  Place prepared lids and bands on the jars and process in a boiling water bath 10 minutes.  Remove from water bath and allow to cool on the counter for 24 hours.  Turn jars periodically to ensure that peppers are distributed throughout the jam as it cools.  If, after 24 hours, any lids have not sealed, put them in the refrigerator and use them promptly.  

Amount of jam will depend on the water content of your peppers.  This recipe should make about 8 pints of jam.  Mine made 9.  I just put the ninth in a clean jar and straight into the fridge for immediate use.  Looking forward to this.

Follow Me on Pinterest

Sunday, March 24, 2013

Fish tacos!


I first had fish tacos at a little joint at Huntington Beach, California.  They were rock-my-socks-off delicious.  Ever since then, I've been determined to re-create that first experience.  This recipe is not exactly like the tacos I had that day, but they are every bit as authentic a California eating experience, and they are rock-star fish tacos.  I kid you not.  Try these and you may find them in your regular rotation for a while.  Or at least as long as your arteries hold out.

Beer-Battered Fish Tacos

Batter
1 cup AP flour
1 teaspoon baking powder
1/4 teaspoon cayenne pepper
1/2 teaspoon salt
1 egg
1 cup beer (plus more to make a thin batter)


Sauce
1/2 cup mayo
1/2 cup plain Greek yogurt
juice of 1 lime
2 tablespoons of capers, chopped
1 jalapeno, seeded and minced
1/2 teaspoon dried oregano
1/2 teaspoon dill weed
1/2 teaspoon cumin
1 teaspoon cayenne (red) pepper

1 lb cod fillets, sliced into 2 oz. chunks
package corn tortillas
shredded cabbage
chopped tomato
vegetable oil (for frying)

Mix the batter and set aside.  Mix the sauce ingredients together and refrigerate.  In a deep, heavy bottomed pot, put one quart of oil and set on medium high heat.  Once the oil is hot, dredge the cod in some flour and then dunk in the batter.  Add no more than 5 pieces at a time.  Do not let them get too dark. Dry cod on paper towels.  Heat a non-stick skillet on high.  Heat a corn tortilla (not too stiff) on both sides.  Load with fish, sauce, cabbage, tomatoes and top off with a little lime juice.

The fish is amazing by itself.  The sauce by itself is amazing.   And, if you use El Milagro corn tortilla shells (out of Chicago), the tortillas by themselves are amazing.  But this dish put together is electric!

The sauce has many more applications beyond this dish.  I can see it as dipping sauce for french fries (even though I'm not a french fry fan), on beef sandwiches, etc.

I'm not a big fan of fried food and I don't make it very often.  (What do you do with all that oil when you are done?)  From a health perspective, I suppose that's a good thing.   But like homemade fried chicken, there is nothing quite like home cooked fried fish.  So I only do this once every two years or so.  I think my arteries will forgive me on those rare occasions.  And this, my friends, was worth it.

On the other hand, the original fish tacos I had in Huntington Beach were grilled.  I'm pretty sure they used tilapia or some other white fish.  I think that you could use any "substantial" white fish (tilapia, cod, perch, etc.) and it would still be fine. I think if you sprinkled that fish with a little cumin and cayenne before baking it, it would also complement the flavors.  So this doesn't have to be only an every-once-in-a-while dish.  I also think it would be more visually appealing with purple cabbage and a nice fresh slice of avocado.  Maybe even a few pinches of shredded carrot.

Delicious.

Follow Me on Pinterest

Sunday, February 10, 2013

Parmesan Enrusted Talipa

There was a time when I was watching my carbs.  Say what you will, it is an effective diet regimen.  Not a lot of fun, but effective.  This dish made it suck just a little less.  OK, a whole lot less.  Then again, I'm a fish lover.  If I had my way, I'd probably die of mercury poisoning.

But all that aside, this no-carb dish is delicious.   If you like fish, you'll love this dish.

I stole this recipe from Food.com.  It isn't often that I prepare Food.com recipes, but the ones I have tried, including Bobby Flay's Orange Jalapeno Turkey, are fantastic.

As I said in my review of this dish, I made it for four adults who can't agree on anything.  Everyone loved this dish.

Because I'm not following a low-carb diet at the moment, I served this with long grain and wild rice.

Topping:
1/2 cup grated parmesan cheese (do yourself a favor and use fresh)
1/4 cup butter, softened
4 Tablespoons mayonnaise
2 Tablespoons lemon juice
1/4 teaspoon garlic powder
1/4 teaspoon dried basil
1/2 teaspoon black pepper
1/8 teaspoon onion powder
1/8 teaspoon celery salt
pinch of table salt
2 lbs tilapia fillets

Directions:
Line a broiler pan with foil and spray lightly with Pam.  Turn the broiler on to heat up.  In a small bowl mix together Parmesan cheese, butter, mayo, lemon juice and garlic.  Add the seasonings and mix well.  Set aside.

Arrange the fillets in a single layer on the prepared pan and broil a few inches from the heat for 2-3 minutes.  Turn the fish over and broil 2-3 more minutes.  Remove from broiler and cover with the Parmesan mixture on the top side only.  Return to oven and broil for about 2 minutes or until the topping is browned and the fish flakes easily.  Don't overcook the fish!

Follow Me on Pinterest

Sunday, January 27, 2013

The best cookies on the planet

I don't say this lightly.  These cookies are it.  They are the perfect texture.  They are sweet, nutty, chocolatey and equally as spectacular after they have cooled.  They are PERFECT dunked in a cup of coffee.  PERFECT I TELL YOU!

Grandma Swisher had this recipe.  Grandma was my maternal grandmother.  She could cook like a baws.  Unfortunately, she didn't pass the skills on to her daughter and I had to learn it all over from scratch.  But this recipe.  She had it forever.  I assume she got it from her mother, who appears to have been something of a baker.  These cookies are so spectacular because they are crisp and chewy at the same time.

There's a couple of tips you need to know.  Don't overcook them.  Let them cool for about 4 minutes on the cookie sheet before moving them to a cooling rack.  (Otherwise, they will fall apart on you.)  Try to keep from eating all the dough.  Try to keep from eating all the cookies straight out of the oven.  Try to control yourself.

Oh hell.  It's useless.

Ingredients & Directions:

1.5 cup AP flour
1 t baking soda
1/2 t salt

Mix together and set aside.

In your mixing bowl, combine

1 cup butter flavored Crisco (which thankfully comes in a convenient 1 cup serving size these days)
3/4 cup brown sugar, packed
3/4 cup granulated sugar
2 eggs, unbeaten
1 t vanilla
1 t hot water

Cream ingredients until well combined.

Add the dry ingredients.  Mix well.  Then, add:

2 cup Old Fashion oats (must be slow cook)
12 oz. pkg of Nestle's chocolate chips
1 cup chopped walnuts (not optional!)

Mix until homogeneous.  Bake at 350F for 8-10 minutes.  Cookies are done when they are only just beginning to show some brown on the top.  At first, you'll think they are undercooked. They are not. If you don't believe me, make a batch, let them cool and then try one before baking any more.

Take them in the vicinity of your favorite suitors and wait for the marriage proposals to start flooding in.

Follow Me on Pinterest

Sunday, September 23, 2012

Red Sauce like your Italian Grandma Made

I used to have time to monkey around on the internet.  And on one of those forays into the Interwebs, I found one of the best recipes of all time.  Anthony's Pasta Sauce, Meatball & Braciole.  This recipe is great for a number of reasons, not the least of which is taste.  But if you want to understand why I love this recipe, you really have to go take a look at Anthony's recipe.  It is, perhaps, the longest recipe you've ever read.  But you don't get bored.  He's entertaining.  And honestly, this is the real deal.

Just like your Italian grandma would have made if you had an Italian grandma.  

Follow Me on Pinterest

Friday, September 14, 2012

Chocolate Espresso Pot de Creme

Pot de creme.  It is just fun to say.  For those non-francophones, you pronounce it po-duh-krem.  But you have to say that last part like you are making fun of the French.  Which you are.  Don't worry.  Every one does.  Say it out loud a few times.  Pot de creme.  Pot de creme.  Pot de creme.  Sounds all wordly and stuff.  This dessert is amazingly simple and you are apt to impress the in-laws with this one.

It contains precious few ingredients and is ready for the fridge in a flash.

Now a few words of advice.  I didn't want an overly sweet dessert so I doubled this recipe and only used 1/3 cup of sugar. This really allowed the bittersweet nature of the chocolate to shine. But I get that a lot of people don't enjoy bitter desserts as much as I do, so feel free to add a little more sugar to taste.


What you'll need:

4 oz. dark chocolate (bittersweet)
1/3  to 1/2 cup sugar
1 cup heavy whipping cream
espresso powder or instant coffee crystals
1/2 teaspoon vanilla extract


Use good chocolate.  I used Giardelli's 70% cacao.  Whoops, make that 60%.


Directions:


Use your kitchen knife to shave the chocolate thin.  Put heavy cream, sugar, and vanilla extract in a small saucepan and heat over low to medium heat until just below the boiling point.  I actually used a double-boiler system.  Do not walk away from this pan.  If you don't stir the cream constantly, it will begin to form curds in the bottom and that is definitely what you don't want in this smooth, rich dessert.  Once you get it to temperature, remove from heat and pour over the shaved chocolate.  Wait one minute.  Sing Yankee Doodle.  Practice your yodeling.  Lick the chocolate shavings off the cutting board like I did.  After one minute, whisk the chocolate and cream until you get the smoothest, richest liquid imaginable.  Pour into small cups or mugs.  I used cordial glasses, but you could also use espresso cups.  If you get air bubbles in your dessert cups, raise the cup up a few centimeters and drop it back gently to the counter.  The air bubbles will be forced to the top and pop leaving you with a perfectly smooth, dessert that looks (and tastes!) spectacular.

Makes four 2-3 ounce servings.  Refrigerate 3-5 hours.  (Mine took about 2 hours to chill.)

The consistency when finished is like a soft fudge.  If you only have a slightly thickened pudding texture, put it back in the fridge for another few hours.  You can top this with whipped cream, but it is excellent as is.  I warn you.  This is 90 kinds of delicious.  It is pure chocolate decadence.


Follow Me on Pinterest

Wednesday, March 23, 2011

Cajun Cookin'

I found some shrimp in the freezer.  Two pounds of it that I refuse to let go bad.  I decided to make perhaps my favorite shrimp dish: seafood gumbo.  So I pull out my trusty Paul Prudhomme cookbook and open 'er up and got busy.

Gumbo is deceptively easy.  Sure, if you are going to make your own stock, you will have to start the day before  But you don't have to do that. I'll tell you about the short-cuts later.


First you chop some veggies.  I used two medium green bell peppers, a couple stalks of celery and at least two onions and about four cloves of garlic.  I was using rather large cloves, so if you have a normal-sized bulb of garlic, you might want to use six.  You'll need about two tablespoons worth.  I like the vegetables diced fairly small and  try to make all the cuts uniform.  Not quite a mince, maybe just a smidgen larger than a fine dice.

Next you need some shrimp stock.  Now under normal circumstances, you'd buy shell-on shrimp and peel the shrimp and use the shells to make your stock.  Making stock takes time, but it's actually a lot of fun. When else do you get to throw in halved unpeeled onions and an entire bulb of unpeeled garlic?  It is fun to watch the stock come together.  So much more fun that making chicken stock.  Unfortuantely, since I bought only tail-on shrimp, there wouldn't be enough shells to flavor a stock.  So I used some of this....


It really has decent flavor for bouillon.  These are large, oversized cubes.  Make a very dark, very pungent stock.  With stock ready, shrimp thawed, and vegetables chopped. I can get busy.  This dish takes a lot less time than you'd think for how great it tastes.

You create a spice mix, which is a combination of white, black and cayenne pepper, paprika, oregano, thyme and some salt.  Oh, and you'd better get the file and Tabasco ready.  This is Louisiana cooking after all.

Melt a stick of butter in a stock pot over medium heat.  When to temperature, add the chopped vegetables and cook for 6 minutes stirring constantly.  Add two tablespoons of file, and the spice mix and a full tablespoon of Tabasco.  Heat over medium heat for 5 minutes.  The file will become very sticky, so you must stir the pan regularly.  Over time, the file will begin to stick to the bottom of the pan, make sure you scrape off any brown bits.  They add flavor and reduce the ability of file to thicken the final product.


Add the tomato sauce and cook over medium heat for another 5 minutes....stirring constantly. Now all you have to do is add your stock and bring it to a boil over medium heat, then simmer over low heat for 45-60 minutes, stirring occasionally.

Look at that nice rich color!


Now is a good time to put on some brown rice.  You don't need a lot.  Gumbo isn't a rice dish.  The rice is an accompaniment.  After 45 to an hour, turn the heat off the stock and add the shrimp and crabmeat and cover.  Ha!  I didn't mention the crabmeat, did I?  But you can't just have one kind of seafood in gumbo.  You can also throw in oysters if you are made of money, which I'm not.  In any event, when the shrimps turn bright red, the meal is ready!If at all possible, you should only put in as much shrimp as you can eat in one meal.  If you cook the shrimp and let it sit in the broth, it will get tough.  This meal is so fluffy I think I'm gonna die!  Oh wait. Wrong movie.


Wow this was good.

Here's the full recipe from Paul Prudhomme's Louisiana Kitchen

1 lb medium shrimp
5 cups basic seafood stock
Seasoning mix:
1.5 teaspoons ground red pepper (cayenne)
1.5 teaspoons sweet paprika
1 teaspoon salt
0.5 teaspoon white pepper
0.5 teaspoon black pepper
0.5 teaspoon dried thyme leaves
0.5 teaspoons dried oregano leaves
1 bay leaf, crumbled

0.5 cup margarine
2 cups chopped onions
2 cups chopped celery
2 cups chopped green bell pepper
3 tablespoons gumbo file (file powder)
1 tablespoon Tabasco sauce
1-2 tablespoons minced garlic
1.25 cups canned tomato sauce
1.5 cups, packed, crabmeat (about 0.5 lb)
1 dozen shucked oysters (about 0.5 lb) (optional)
1.33 cups cooked brown rice

Peel shrimp, rinse and drain.  You can use the shells and heads to make shrimp stock if you want.  Otherwise, refrigerate shrimp while you make the rest of the dish.  Combine the seasoning mix ingredients in a small bowl and set aside.  In a 4-quart heavy soup pot, melt the margarine over medium heat.  Add the onions, celery and bell peppers.  Turn heat to high and stir in the gumbo file, Tabasco, garlic, and seasoning mix.  Cook 6 minutes, stirring constantly.  Reduce heat to medium and tir in the tomato sauce; continuing cooking 5 minutes, stirring constantly. Add the stock and bring gumbo to a boil; reduce heat and simmer 45-60 minutes, stirring occasionally.  Add the shrimp, crabmeat and oysters (if desired); cover and turn off the heat. Leave the pot covered just until the seafood is poached, about 6-10 minutes.  Serve immediately.

For a main course, place about 1/3 cup rice in a bowl and top with about 1 cup gumbo.  For an appetier, serve about half that amount.

This is rich folks.  Rich, rich, rich.  And delicious.  And I gotta go eat.  :)

Follow Me on Pinterest

Wednesday, December 22, 2010

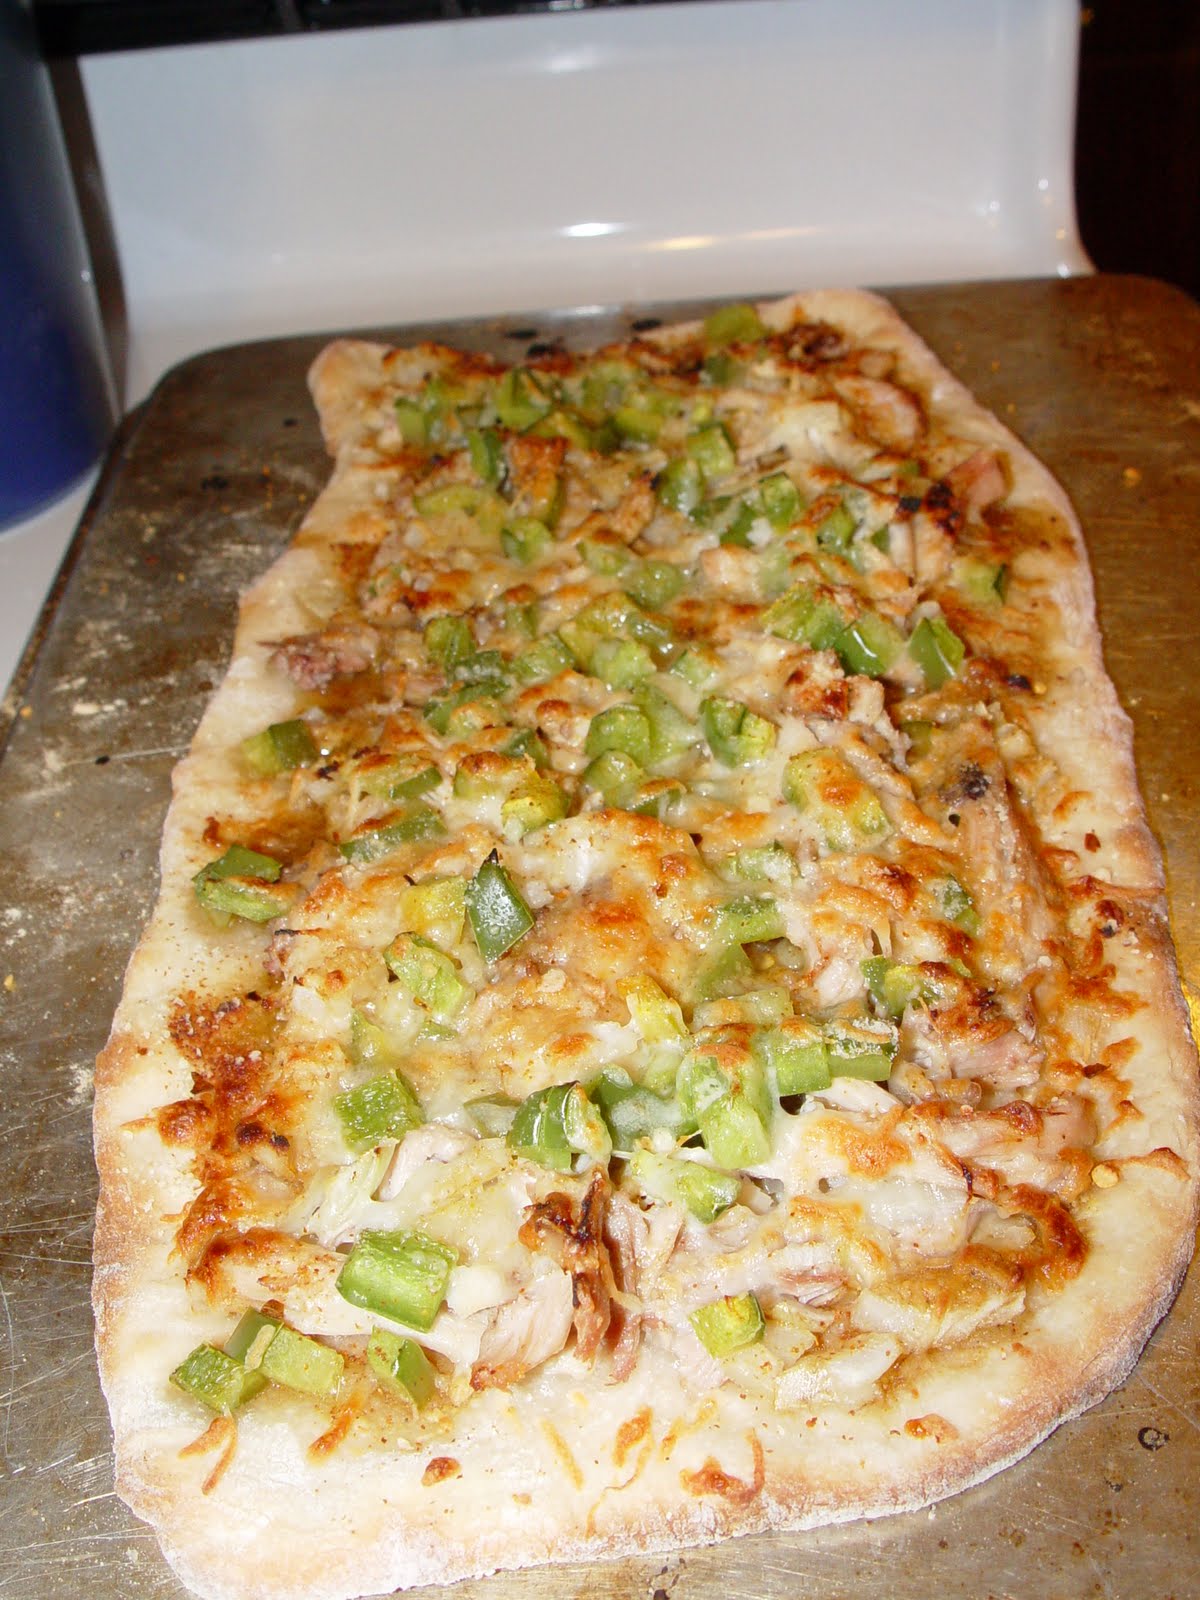
Curry Chicken Pizza

Wow. It was an experiment that went terribly, terribly right. I was out of tomato sauce. I had some chicken on hand. I wanted pizza. It was like Charles Goodyear with the rubber thing. Enjoy.

Ingredients
2.0 oz. chicken breast, boiled, then diced
1.5 T Fat-free curry salad dressing, give or take
One green pepper, diced
One onion, cut in thin strips
2.5 oz mozzarella cheese, shredded
1/6th Peter Reinhart's Napoletana Pizza Dough Recipe

Nutritional Information:
No. of servings: 1 (let's be honest here!)
KCal: 954
Weight Watchers PointsPlus:  25
Total fat: 29g  Saturated fat: 12g
Carbs: 125g Dietary fiber: 11g
Protein: 50g

Starting with thawed pizza dough, allow to come to room temperature for at least 2 hours. When room temperature, preheat oven as high as you can get it. (My oven allows me to get to 550F, but most home ovens won't go much over 500F.) Allow the pizza stone to heat for at least 30 minutes. Don't have a pizza stone? You can use the back of a cookie sheet well covered in cornmeal (to prevent sticking). Do NOT preheat the cookie sheet.

Follow the directions on the pizza dough recipe exactly for preparing the dough for toppings.

When the pizza dough is ready, pour the salad dressing atop the dough and spread around with the back of the spoon. Add a small handful of chicken to the pizza, a handful of peppers, a handful of onions, and a handful of the cheese. Less is more here, folks.

Slide it into the oven and bake for 8 minutes. Do not overcook. You can top with some red pepper flakes, but go easy on the Parmesan cheese. You don't want to hide this flavor.

Allow to cool at least 10 minutes if you can. Don't blame me for the scalded mouthtop.

Your pizza eating days will never be the same again. You can thank me in the comments. :)

Follow Me on Pinterest