Tuesday, February 1, 2011

The Best Foods I Ever Ate, Episode 1

I love food.  Nooooo, you say.

Yes, I swear.  I love food. And National Peanut Butter Lover's Day last week got me to thinking about my favorite foods.  And even more specifically, the best foods I ever ate.

What are the best foods you ever ate?  It's a hard question.  So I decided I was going to explore some of the most memorable tastebud tinglings that I have had the pleasure to enjoy.

We will start with a trip to Florence, Italy.  Florence is a fantastic place.  They have David.  They have beautiful tile roofs.  After an afternoon of sightseeing, climbing to the top of Il Duomo, and viewing the Baptista, you know what would sound good about now?

Ice cream.

Sunday, January 30, 2011

Stuffed Green Peppers


A "cleaning out my fridge meal" and nothing more.  I found these beautiful, cavernous green peppers on sale at Schnuck's for 2/$1. They were screaming "stuff me".

So I did.

Saturday morning was the Ground Hog Day Brunch and I took about 2 lbs of sausage.  I had about a half pound of crumbled sausage left and I decided to put it to use here.

Did you know that breakfast sausage is incredibly fattening?  I KNOW!  Who'da thunk it?  Oh well.  There are many, many ways to make stuffed peppers and I've tried a number of recipes over the years, but for some reason, my tastes tend to gravitate toward just-a-little-bit-spicy and let-the-peppers-shine.  So, I try not to overdo the spices in this dish.  Also, since I tend to make it once a year when it's cold and wet and crappy outside and when it seems spring will never come again.  This is comfort food, plain and simple.  You just want something that makes you warm and happy.  And has sausage in it.

Ingredients:
6 large bell peppers
2.5 cups calrose rice (uncooked)
1/2 lb. cooked breakfast sausage
1 lb ground beef, browned and drained
1 zucchini, diced
2 small cans or 1 large can original Rotel tomatoes and peppers
1 jar spaghetti sauce

Cook rice according to package instructions.  In my case, I used 2.5 cups of rice in 4 cups water.  When cooked, set aside to cool.  Cut the tops off the green peppers and remove the seeds and membrane inside.  Remove the stem from the top, but retain the top.  Place the rice in a large mixing bowl.  Add the ground beef, sausage, zucchini, and Rotel (do not drain) to the rice and mix well.  Scoop the rice mixture into the green peppers.  Stuff them well and place the top of the pepper on top of the rice mixture.  Place all peppers in a baking dish.  Pour the spaghetti sauce into the dish and bake the peppers in a 325 degree oven 35-40 minutes.  The peppers should be cooked but still firm.

Servings: 6
Kcals: 516
Fat: 27g
Carbs: 44g  Dietary fiber: 5g
Protein 24g
Weight Watchers PointsPlus: 16

Yowza.  That's a lotta points for one bell pepper.  So when I made it, I left out the ground beef.  Because really.  You thought I was gonna leave out sausage?  Hahahahahaha!  Anyway, sans ground beef, we're down to 13 PointsPlus, but 3 points is a big savings.  What the hell.  They don't call it comfort food for nothing.

Post script:  You can't eat a whole one of these peppers.  I ate 3/4 of one and thought I was going to have to lay down for a bit.  A half of one is plenty for an adult's main meal.  This cheap little meal is going to last me  LONG time!

Follow Me on Pinterest

Peanut Butter Cookies

Well, I'm a little tardy for PB Day, but here is an awesome recipe for peanut butter cookies.

Peanut Butter Cookies
Makes 2 1/2 dozen
by Leanne D

Preheat gas oven to 350 degrees (325 for electric).

1/2 cup butter flavor Crisco
1 cup brown sugar
-cream the above together

add:
1 large egg
1/2 tsp vanilla
1 cup peanut butter (I use smooth Jif)

sift or whisk in separate bowl:
1 1/2 cup flour
1 tsp baking soda
1/4 tsp salt

Mix dry ingredients into peanut butter mixture. Wrap in plastic and chill. Roll into 1 inch balls and press lightly onto ungreased cookie sheet. With a fork dipped in flour, make a criss-cross design into top of cookies and flatten.

Bake in preheated oven for 9 min. Let cool for a minute or two on baking sheet then transfer to wire rack or wax paper to cool.

Meal Planning

I'm taking a stab this week at actual meal planning.  As part of my diet, food control is fairly important.  As a poverty stricken graduate student, not wasting food is, too.  I also need to consider that I'll probably be moving in May (to a location to be determined), so I need to clean out my freezer.  So, I'm taking stock of my current food situation and trying to see if I can't swing an entire week without a substantial grocery trip.


Wednesday, January 26, 2011

Beef Bourguignon

Wow. This was a lot of work. But the sauce is so worth it. I followed the recipe published by Macheesmo. Since I've given you the link, I'm not going to the trouble of re-posting the recipe myself. I did make some modifications as I couldn't find pearl onions despite trying three different grocery stores. Not frozen. Not canned. Not fresh. I also used a rump roast instead of a chuck roast, but beware. I'll clue you in on why you might not want to do that.

I started the meat on to braise and while things were heating up in the pan over by the stove, I got to chopping. All in all, not too much prep involved in that. What we have here is onions, carrot, garlic, and parsley.


The meat had to brown on four sides.

Then you just dump it in your dutch oven.

Now you get the aromatics going in all that fat and butter. Add a little tomato sauce and it really starts to smell wonderful.

Deglaze the pan with a half cup of brandy and add that to the beef in the pot.

Then you add the better part of a bottle of wine and just enough beef broth to cover the meat. Throw in your parsley, some thyme, a few cloves of, well, cloves, couple of bay leaves and let it simmer for an hour.

After an hour, it starts to look like this.


You add some chunks of carrot and let it simmer for another hour. At this point, I sauteed some button mushrooms and because I couldn't find any pearl onions, I skipped that part.


And here it is. This sauce is beyond wonderful. It is every thing that was promised in a 3-hour sauce and then some. Only there was one problem. The beef was dry. Not just a little dry. Like, holy moly, did my mother cook this thing? In any event, I think it was the cut of meat. I had a rump roast and I think I should have used a chuck roast, a cheaper piece of meat. I think cooking some pieces of meat that long works and with others it just dries them out. The rump roast I used was one of the latter.

So I'm thinking I'll just save this sauce--maybe freeze it-- and when summer comes and I have a taste for a steak, I'm ready to go. Or maybe I'll just warm this sauce up in the microwave and drink it from a coffee mug to warm me up.

Really. It's that good.

Oh, Weight Watchers PointsPlus:  14 per cup.  Don't even think about it.

Follow Me on Pinterest

Monday, January 24, 2011

National Peanut Butter Lover's Day


At last, it is here! National Peanut Butter Lover's Day! January 24!!!

Peanut butter is my favorite food.

Of. All. Time.

Popcorn is a close second, but it is second.

In honor of the most fabulous food day of the year, I will list my top 10 list of Best Ways to Enjoy Peanut Butter.

Saturday, January 22, 2011

Southwestern Rub

A very simple rub for chicken and pork. Made it up myself. I make a large batch of this and just have it on hand for Mexican food emergencies.

Ingredients:

1 tablespoon cumin
2 teaspoons chili powder
1 teaspoon garlic powder
1 teaspoon onion powder
1/2 teaspoon salt or seasoned salt
1/2 teaspoon ground chipotle pepper
pinch of ground cayenne pepper

You can go less or more on the cayenne, depending upon your heat tolerance.

Store in an airtight jar and use liberally to rub on meat. Get creative!

Follow Me on Pinterest

Sunday, January 16, 2011

Avgolemono Soup

Backstory on this dish is this. In Chicago, almost every neighborhood diner is owned by a Greek family.  And every special on the menu usually has a soup course.  And almost every soup course has no selection, it just IS Avgolemono or lemon-egg soup.  Man, does this ever spell comfort food for me.  It also makes my heart ache for Chicago.

At least I can have a little bit of Chicago right here in southern Illinois with this recipe.  Added bonus:  it's not too bad on the ol' waistline.

Saturday, January 15, 2011

Ciabatta!

 In the town where I grew up, there were two grocery stores:  IGA and Gateway.  And sometimes, if you were very, very lucky, Gateway sold freshly baked bread.  It was right there on the counter in this miniscule bakery they had right by the meat section.  And when we smelled that heavenly smell, my sister and I made a bee line to see if there was any bread left.  Maybe that's where I first fell in love with homemade bread.  If so, thus began a lifelong love affair.  Since I fell in love with cooking and eating, I naturally decided to master bread baking.  I'm still working on that mastery.

Baking bread is an art.  It takes knowledge and skill, imagination and faith.  Ciabatta is a prime example.  The dough is so wet that you are certain there is no way that is every going to make anything other than a re-creation of Jabba the Hut.  Well, I'm here to tell you that ciabatta is possible, if you just have faith.

Ciabatta (from America's Text Kitchen Television Show 10th Anniversary Best Recipes 2001-2010)

Sponge
1 cup (5 ounces) unbleached all-purpose flour
1/8 teaspoon instant or rapid-rise yeast
1/2 cup water, room temperature

Dough
2 cups (10 ounces) unbleached all-purpose flour, plus extra for the dough and work surface
1 1/2 teaspoons table salt
1/2 teaspoon instant or rapid-rise yeast
1/4 cup milk, room temperature
3/4 cup water, room temperature

Number of servings:  2 loaves x 8 slices per loaf (this is a generously sized slice!  so 16 servings)
KCal:  88
Total fat: 0g
Carbs: 18g Dietary fiber: 1g
Protein: 3g
Weight Watchers Points Plus:  2


Mix the sponge in a medium bowl until a uniform mass forms, about 1 minute.  Cover the bowl tightly with plastic wrap and let stand at room temperature for at least 8 hours but up to 24 hours.  Over this 24 hours, the yeast will begin to ferment the bread, bubbles will form on the surface, and the sponge will begin to look very wet.  Like so.


Honestly, it reminds me of a pancake ready to flip.  When the sponge is done, ready the dry ingredients.


Then the wet ingredients.  A little tip: if you are lactose intolerant, you needn't worry about that these days.  This stuff will do.


Put the sponge and the wet and dry ingredients in the Kitchenaid mixer and using the paddle, let her rip.  Did I mention that sponge would be VERY wet?


Takes about 6-8 minutes til the dough comes together as a single mass.  You must have faith.  It takes that long for the gluten to develop.  You will doubt yourself at this point because SURELY no bread dough was ever this wet.

Then you switch to the dough hook.  Another 10 minutes.  I just set a timer and let it go.  Sometimes the dough will come together as a mass.  Today, mine never did.  I was fearless.


Now you must let the dough rise.  (Cover with plastic.)  When it has doubled in size, you take a bench scraper to the sides of the bowl and draw the dough over onto itself 8 times (turning the bowl a quarter turn as you work).  Cover again with the plastic wrap and let it rise again until doubled or tripled in size.  My kitchen was cold, so this took a while.  Maybe two hours.


Lots o' bubbles at this point.  Now, you want to cut out two pieces of parchment about 6"x12".  Dust them liberally with flour and spill out that very wet dough onto them. You will want to liberally dust all sides of the dough right away so you can work with it because it is seriously very Jabba-the-Hut-like at this point.  Take your bench knife and divide it in two, putting each piece on its own parchment. Do not forget to liberally dust the parchment before you attempt this.  You'll spend the next 20 minute of your life trying to detach the bread from the paper.  When you can handle it, stretch each dough piece into a very long rectangle.  You want to pick the dough up (with well floured hands), stretching it to about 3 feet in length and fold it like a business letter in thirds.  It will shrink up a little bit.  Then form it into a rough rectangle and let it rise for at least 30 minutes while your oven preheats to 450 degrees.

Although they are hard to see in this pic, there will be little air bubbles forming all over the surface of the dough.  This is good. 

Bake 22-27 minutes on a baking stone (opening oven to spray dough with water twice during the first 5 minutes.  So, ok.  I don't have a water sprayer or an oil sprayer.  So I flick a generous amount of water onto the dough.  It doesn't seem to matter.  Because look!  Voila!  Perfect ciabatta!


I can't even describe the smell, but you are going to have a hard time holding off from slicing it right away.  The crust is chewy, the airy interior is tender.  This stuff is dangerous.  Dogs must be locked in another room.  I take this bread and I slather it with a lovely jalapeno-infused honey that I made back in the summer.

Man, life is good.  Isn't it?

Follow Me on Pinterest

Friday, January 14, 2011

Soup Addiction

I've been on a soup kick lately.  I've been gathering recipes for soups to get us through this long, cold winter.  Then, I went visiting Liv and she made me soup. A Schmale Favorite soup.  Chicken and Wild Rice.  It was great.  So great, that I was back less than 24 hours and I had to make it for myself.  So, without further ado, my version of Schmale's Chicken and Wild Rice.

Saturday, January 1, 2011

Ho hum Vegetable Lasagna and Kick Ass Eggplant Dip

I made a Weight Watchers recipe of roasted vegetable lasagna for New Year's Day at Bek's.  Spoiler alert:  I'm not impressed. 

Wednesday, December 29, 2010

Smoked Sausage and Bread Appetizer

I tried this recipe for Christmas eve and it was a huge hit. I could have made myself sick on it if I hadn't stopped! It is NOT what you might call "healthy", but then again isn't something you would eat every day. I may make it again for our bowl game on Saturday.

Tuesday, December 28, 2010

Butternut Squash Soup

Easy peasy.  Tastes pretty good.  Do not make the mistake I made and use chicken broth.  Honestly, I could have sworn that said chicken broth.  In any event, chicken is the dominant taste when you use chicken broth.  It is also salty.  I'm going to make this again when I can read.

Here's the particulars. 
Serving size: 1 cup
KCalories, 82
Weight Watchers PointsPlus: 1 
Fat, 0g
Carbs, 19g
Dietary Fiber, 3g
Protein, 3g

Ingredients
32 oz. vegetable broth, low sodium
1 medium butternut squash, peeled and chopped in 1" cubes
1/2 apple, peeled, cored and diced in 1" cubes
1/2 onion, peeled and diced in 2" slices
salt and pepper to taste
1/8 teaspoon ground nutmeg

Place broth, squash, apple and onion in a stock pot and boil until the squash is tender, about 15 minutes.  Remove from the heat and allow to cool at least 15 minutes.  Using an immersion blender, blend ingredients thoroughly.  Or put in blender in batches.  Return to pot.  Season with salt (be careful if you didn't use low-sodium broth) and pepper.  Add a pinch of ground nutmeg as a garnish before serving.  Can be served warm, cold, or room temperature.

Follow Me on Pinterest

Sunday, December 26, 2010

A Well Equipped Kitchen

I'm on an organizing kick. Blame the outrageous amount of work I should be doing. Blame Liv who is moving moved and got me thinking about having to move myself. Blame my own foodie tendencies. But whatever it is, I'm tortured by thoughts of what I actually need in my kitchen and how to make better use of it.

Wednesday, December 22, 2010

Senegalese Peanut Stew (Vegetarian)

OMG. Stop what you are doing right now and go to the grocery if you have to because you have GOT to have this chowder and like NOW.

The Schmale's Favorites

Did I mention that I'm in love with Guy and Julie Dumper Schmale's food blog, The Schamle's Favorites? If you want to think you've died and gone to heaven, try this chicken salad recipe.  Or this hummus recipe.Oh God.  And this beer can chicken recipe.

These two made me rethink my foodie credentials.  Enjoy!

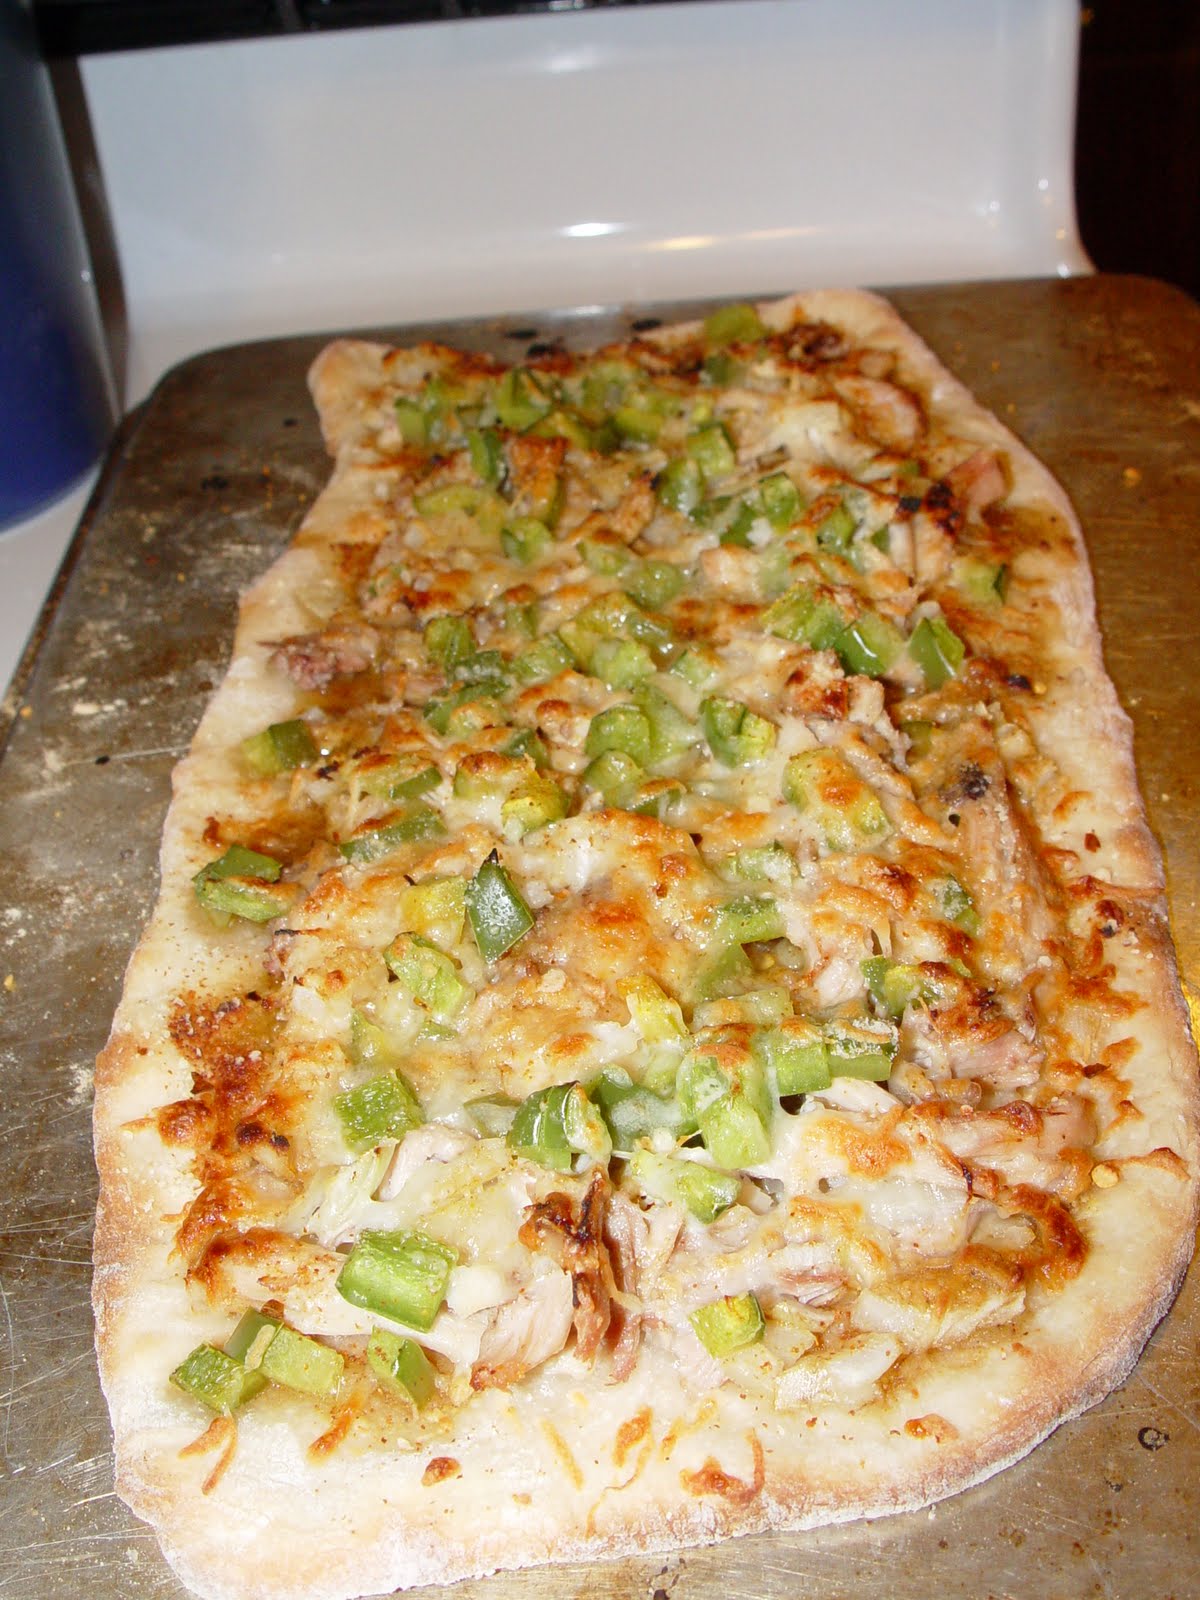
Curry Chicken Pizza

Wow. It was an experiment that went terribly, terribly right. I was out of tomato sauce. I had some chicken on hand. I wanted pizza. It was like Charles Goodyear with the rubber thing. Enjoy.

Ingredients
2.0 oz. chicken breast, boiled, then diced
1.5 T Fat-free curry salad dressing, give or take
One green pepper, diced
One onion, cut in thin strips
2.5 oz mozzarella cheese, shredded
1/6th Peter Reinhart's Napoletana Pizza Dough Recipe

Nutritional Information:
No. of servings: 1 (let's be honest here!)
KCal: 954
Weight Watchers PointsPlus:  25
Total fat: 29g  Saturated fat: 12g
Carbs: 125g Dietary fiber: 11g
Protein: 50g

Starting with thawed pizza dough, allow to come to room temperature for at least 2 hours. When room temperature, preheat oven as high as you can get it. (My oven allows me to get to 550F, but most home ovens won't go much over 500F.) Allow the pizza stone to heat for at least 30 minutes. Don't have a pizza stone? You can use the back of a cookie sheet well covered in cornmeal (to prevent sticking). Do NOT preheat the cookie sheet.

Follow the directions on the pizza dough recipe exactly for preparing the dough for toppings.

When the pizza dough is ready, pour the salad dressing atop the dough and spread around with the back of the spoon. Add a small handful of chicken to the pizza, a handful of peppers, a handful of onions, and a handful of the cheese. Less is more here, folks.

Slide it into the oven and bake for 8 minutes. Do not overcook. You can top with some red pepper flakes, but go easy on the Parmesan cheese. You don't want to hide this flavor.

Allow to cool at least 10 minutes if you can. Don't blame me for the scalded mouthtop.

Your pizza eating days will never be the same again. You can thank me in the comments. :)

Follow Me on Pinterest

Crustless Spinach Quiche

This is one of my best kept diet secrets. This is a big-bold-flavor quiche and I promise that you won't miss the crust. The Gruyere cheese lends a slightly sweet, but not over-the-top cheese flavor. The spinach and onions are perfection. It's also a pretty meal. Just right for those mornings when you can enjoy a cup of coffee and the morning news.

Never having been a fan of pie crust, this really works for me. Pie crust is fattening! Why miss out on the things you love because they contain elements you don't? I understand I'm in the minority here. I get that some of you LOVE, LOVE, LOVE pie crust and might feel jilted, but I promise this is a good quiche. Also, there is no reason you couldn't use pie crust if you aren't on a diet. In that case, I'd add four slices of crisp cooked and crumbled bacon to the mix before baking.

Just a couple of notes.  My complaint with most quiches, other than the crust, is that they usually overdo the cheese.  One ounce of cheese is a slice about as thick as your thumb.  That's why I use a high-flavor cheese.  A little stretches a long way and does so without all those extra (and IMHO unnecessary) calories.  Also, you can use frozen spinach, just thaw and squeeze out as much water as possible.  However, I don't think the taste is the same with frozen spinach and use fresh whenever it is available at a reasonable price.  This is why we grow spinach in our own gardens, folks!  I make one of these a month--at least!

KCalories per slice: 94
Total fat: 5g; Saturated fat: 2g
Total carbs: 5g; Dietary fiber: 1g
Protein: 8g
Weight Watchers PointsPlus per serving: 2
One serving = 1/8 of pie; serves 8

Ingredients
3 whole eggs, beaten
1/2 cup egg white only, egg substitute (like Egg Beaters)
10 oz. package of fresh baby spinach
1 whole onion, diced or sliced in thin strips
1 oz. of Gruyere or other strong cheese, shredded
1/2 cup fat-free milk
Pam spray
1/4 teaspoon of vegetable shortening (just enough to prevent sticking)

Coat the bottom of a non-stick pan with cooking spray. Caramelize onions over very low heat. Babysit the pan. You don't want french fried onions. You want tender onions with a good bit of caramel color. Remove onions from pan and set aside to cool. Spray the pan with non-stick spray and add the spinach in two batches. Turning constantly, cook only until wilted and remove promptly. Set aside to cool.

Preheat the oven to 350. Grease the baking dish with the smallest amount of vegetable shorting possible. In a medium bowl, crack and beat the eggs. Add the egg whites and milk and stir well. When the onions and spinach have cooled (and not before unless you want scrambled eggs), add them to the eggs, then add the cheese. Stir well, and put the mixture in the greased baking dish. Bake at 350F for about 30 minutes. The quiche is done when it is slightly brown toward the edges and just set in the middle. Do not overcook.

Allow to cool for at least 10 minutes before serving. Can be served warm or cold.

Follow Me on Pinterest

Peter Reinhart's Napoletana Pizza Dough Recipe


From 101 Cookbooks. This is the only pizza dough recipe I use anymore. It is airy, chewy, and has a superb texture.  I suppose you could make this lower-fat by leaving out the olive oil, but why?  For Pete's sake.  Loosen up a bit.  If you are going to splurge on pizza, actually splurge on something that makes it worth it.

-- Daktari

Number of servings:  6
Serving size: 1 9-12" pizza
KCals: 415
Fat: 9g  Saturated fat: 1g
Carbs: 67g Dietary fiber: 1g
Protein: 10g
Weight Watchers Points Plus: 10


Heidi notes: Peter's recipe says the olive (or vegetable oil) is optional. I use it every time - always olive oil, not vegetable oil. I love the moisture and suppleness it adds to the dough, and it makes your hands soft too.
4 1/2 cups (20.25 ounces) unbleached high-gluten, bread, or all-purpose flour, chilled
1 3/4 (.44 ounce) teaspoons salt
1 teaspoon (.11 ounce) instant yeast
1/4 cup (2 ounces) olive oil (optional)
1 3/4 cups (14 ounces) water, ice cold (40°F)
Semolina flour OR cornmeal for dusting
1. Stir together the flour, salt, and instant yeast in a 4-quart bowl (or in the bowl of an electric mixer). With a large metal spoon, stir in the oil and the cold water until the flour is all absorbed (or mix on low speed with the paddle attachment), If you are mixing by hand, repeatedly dip one of your hands or the metal spoon into cold water and use it, much like a dough hook, to work the dough vigorously into a smooth mass while rotating the bowl in a circular motion with the other hand. Reverse the circular motion a few times to develop the gluten further. Do this for 5 to 7 minutes, or until the dough is smooth and the ingredients are evenly distributed. If you are using an electric mixer, switch to the dough hook and mix on medium speed for 5 to 7 minutes, or as long as it takes to create a smooth, sticky dough. The dough should clear the sides of the bowl but stick to the bottom of the bowl. If the dough is too wet and doesn't come off the sides of the bowl, sprinkle in some more flour just until it clears the sides. If it clears the bottom of the bowl, dribble in a tea- spoon or two of cold water. The finished dough will be springy, elastic, and sticky, not just tacky, and register 50 to 55F.
2. Sprinkle flour on the counter and transfer the dough to the counter. Prepare a sheet pan by lining it with baking parchment and misting the parchment with spray oil (or lightly oil the parchment). Using a metal dough scraper, cut the dough into 6 equal pieces (or larger if you are comfortable shaping large pizzas), You can dip the scraper into the water between cuts to keep the dough from sticking to it, Sprinkle flour over the dough. Make sure your hands are dry and then flour them. Lift each piece and gently round it into a ball. If the dough sticks to your hands, dip your hands into the flour again. Transfer the dough balls to the sheet pan, Mist the dough generously with spray oil and slip the pan into a food-grade plastic bag.
3. Put the pan into the refrigerator overnight to rest the dough, or keep for up to 3 days. (Note: If you want to save some of the dough for future baking, you can store the dough balls in a zippered freezer bag. Dip each dough ball into a bowl that has a few tablespoons of oil in it, rolling the dough in the oil, and then put each ball into a separate bag. You can place the bags into the freezer for up to 3 months. Transfer them to the refrigerator the day before you plan to make pizza.)
4. On the day you plan to make the pizza, remove the desired number of dough balls from the refrigerator 2 hours before making the pizza. Before letting the dough rest at room temperature for 2 hours, dust the counter with flour, and then mist the counter with spray oil. Place the dough balls on top of the floured counter and sprinkle them with flour; dust your hands with flour. Gently press the dough into flat disks about 1/2 inch thick and 5 inches in diameter. Sprinkle the dough with flour, mist it again with spray oil, and cover the dough loosely with plastic wrap or a food-grade plastic bag. Now let rest for 2 hours.
5. At least 45 minutes before making the pizza, place a baking stone either on the floor of the oven (for gas ovens), or on a rack in the lower third of the oven. Heat the oven as hot as possible, up to 800F (most home ovens will go only to 500 to 550F, but some will go higher). If you do not have a baking stone, you can use the back of a sheet pan, but do not preheat the pan.
6. Generously dust a peel or the back of a sheet pan with semolina flour or cornmeal. Make the pizzas one at a time. Dip your hands, including the backs of your hands and knuckles, in flour and lift I piece of dough by getting under it with a pastry scraper. Very gently lay the dough across your fists and carefully stretch it by bouncing the dough in a circular motion on your hands, carefully giving it a little stretch with each bounce. If it begins to stick to your hands, lay it down on the floured counter and reflour your hands, then continue shaping it. Once the dough has expanded outward, move to a full toss as shown on page 208. If you have trouble tossing the dough, or if the dough keeps springing back, let it rest for 5 to 20 minutes so the gluten can relax, and try again. You can also resort to using a rolling pin, though this isn't as effective as the toss method.
7. When the dough is stretched out to your satisfaction (about 9 to 12 inches in diameter for a 6-ounce piece of dough), lay it on the peel or pan, making sure there is enough semolina flour or cornmeal to allow it to slide. Lightly top it with sauce and then with your other top- pings, remembering that the best pizzas are topped with a less-is-more philosophy. The American "kitchen sink" approach is counterproductive, as it makes the crust more difficult to bake. A few, usually no more than 3 or 4 toppings, including sauce and cheese is sufficient.
8. Slide the topped pizza onto the stone (or bake directly on the sheet pan) and close the door. Wait 2 minutes, then take a peek. If it needs to be rotated 180 degrees for even baking, do so. The pizza should take about 5 to 8 minutes to bake. If the top gets done before the bottom, you will need to move the stone to a lower self before the next round. if the bottom crisps before the cheese caramelizes, then you will need to raise the stone for subsequent bakes.
9. Remove the pizza from the oven and transfer to a cutting board. Wait 3 to 5 minutes before slicing and serving, to allow the cheese to set slightly.
Makes six 6-ounce pizza crusts.
from The Bread Baker's Apprentice by Peter Reinhart (Ten Speed Press)

Follow Me on Pinterest

Fat-free Curry Salad Dressing

Yes Olivia, this is the recipe.

Hands down, my favorite salad dressing. Unlike store-bought dressings, this doesn't languish in the door of my fridge until well past its expiration date. No, this has to be made fresh a LOT because once made, I suddenly have an irrepressible urge to have lots and lots of salad.

*Shamelessly stolen from an Allrecipes post, but in my defense, I have adopted this to many more uses than just topping salads.

2 tablespoons balsamic vinegar
2 tablespoons rice vinegar
4 teaspoons honey
1 teaspoon curry powder
2 teaspoons Dijon mustard
Salt, pepper to taste

This is terrific on romaine, spinach, or Boston bibb. My favorite use of this salad dressing is as a base for a curry chicken pizza.

Serving size: 1 tablespoon
Number of servings:  I'm going to say about 8?
KCal:  81
Fat: 1g  Saturated fat: 0g
Carbs: 18g  Dietary fiber: 2g (not sure I believe this)
Protein: 1g (or this!)
Weight Watchers Points Plus: 2

Follow Me on Pinterest